But maybe less volcano than you’re expecting


Like many others during quarantine, I was struggling to find the motivation to do really anything. I spent a lot of time rotating through social media apps trying to find anything to distract me for more than 4 minutes. So, I spent a lot of time on Pinterest, looking at cross-stitch patterns and quilting methods until I finally found a project that I was interested in working on.
I was inspired to make this by a project that I saw on Pinterest, which is where I found the patterns for most of this project. I have reformatted them into some easy-to-use cross stitch patterns that I followed when I made my project, but I will acknowledge that this project wasn’t entirely my own. While I looked for a legitimate pattern for this project, I couldn’t ever find one, so I had to really set out to make my own, which I did by hand in an old graph paper notebook I used for my cells lab.
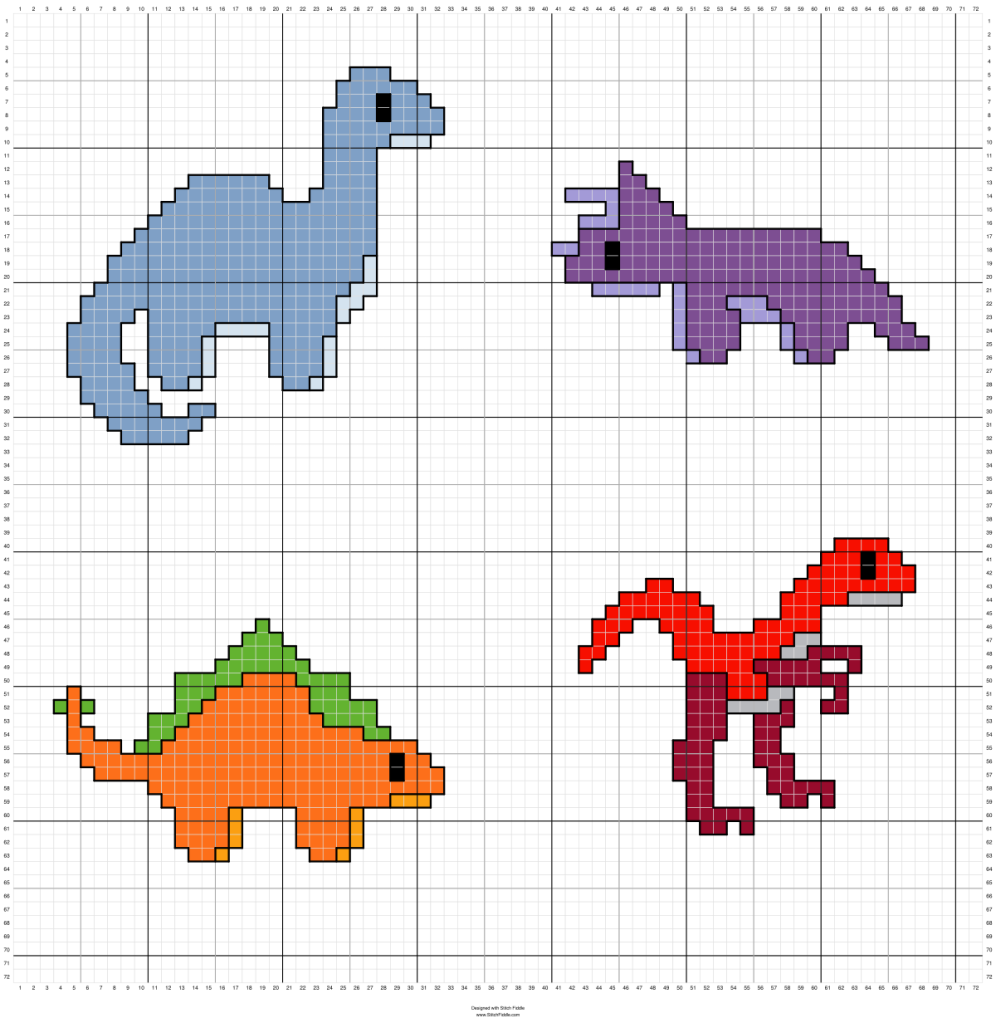
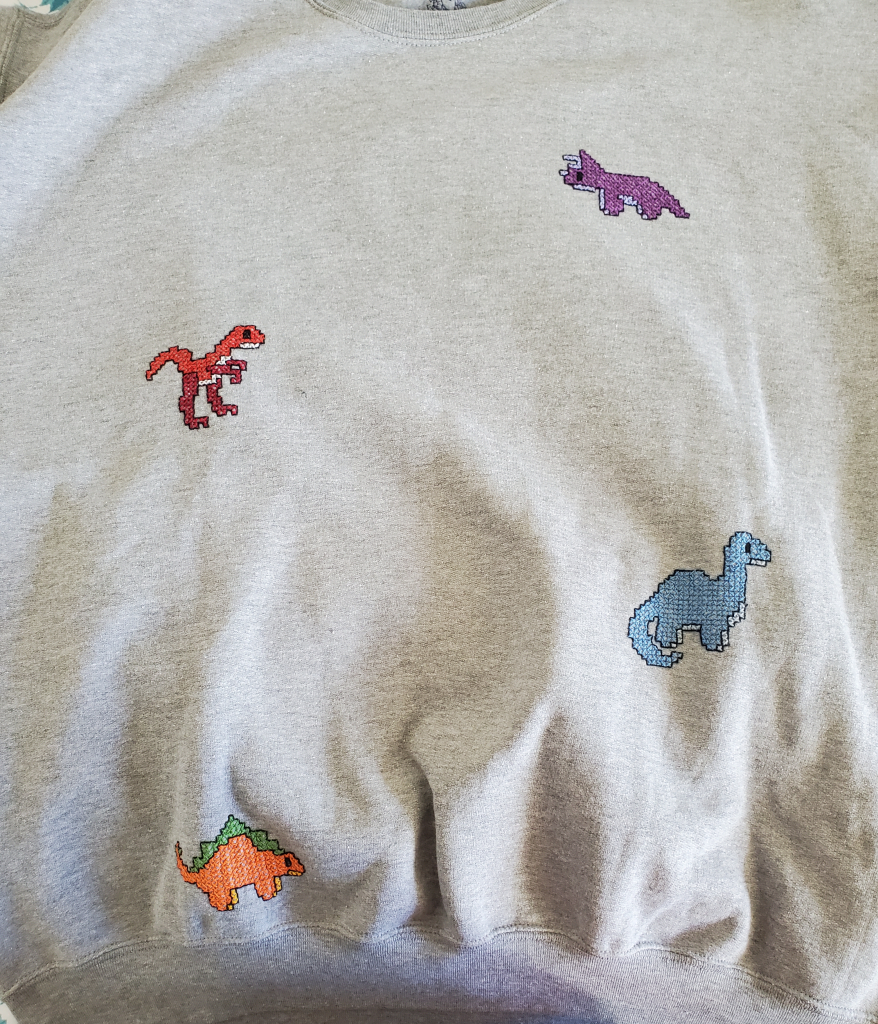
Here’s some information on the dinosaurs I used for the front of the shirt: red velociraptor, purple triceratops, orange stegosaurus, and blue brontosaurus. I also used a stegosaurus, triceratops, and brontosaurus on the back of the shirt too! There’s no real reason why I used these dinosaurs, other than I had found these patterns to use and they’re all easily recognizable dinosaurs. Obviously, none of these colors are accurate to how the dinosaurs actually looked like, I just wanted to use nice bright colors because it’s fun and I had a lot of random floss that I could use for these!
This project really is just a combination of me looking at all the extra supplies I had in my house and a project I was passionate about and just me sitting down and doing it. All in all, the whole project took me a week to finish, but if worked on it a little bit more consistently it probably would have only taken me 4 days.
Pattern
One thing I had to learn about when starting this project was how to use waste canvas and what that was exactly. So, waste canvas is essentially just like the Aida you would use for a regular cross stitch project, but the fabric itself isn’t as put together so that you can remove it after the project is done. One of my biggest struggles, in the beginning, was trying to figure out how exactly to stitch with it because you want the stitches to stay together, but the “holes” were difficult to understand. As you can see in this picture, there are smaller holes that you can stitch through and large holes that are there for some other reason.

Anyway, once you figure out how to start stitching on the waste canvas, the project starts to go along much like any other normal project. Taking out the canvas isn’t as bad as I thought it would be either, as long as you don’t accidentally stitch through the waste canvas itself. I did that a few times and it was a pain to try and get the waste canvas out of the stitches without ruining the project. If you’re looking for some tips on how to use waste canvas, both of these blogs have some helpful tips you can use.
I ended up converting patterns of all the dinosaurs that you can use if you want! I originally reformatted these all by hand on graph paper, but I converted them to a digital format just to keep the patterns themselves cleaner. All of the big dinosaur designs were made by Yarn Geekery as a crochet pattern, but I did convert them into the cross-stitch pattern that I used. The smaller dinosaurs on the back of the shirt were a pattern I found on Pinterest as well, but they don’t have a link to the original poster, which is one of the problems of using Pinterest in general. In contrast to my other posts, I used 2 strands of floss for the main stitches, but 2 strands of floss for the backstitch because I wanted all the colors to stand out.
I’m going to be honest with y’all right now. The volcano was around 95% improvisation and like 5% planning. As much as I would like to supply you with a pattern for the volcano, it’s almost impossible to make with the software I use. So instead, I’m just giving you tips that should help you should you choose to do this!

I just drew a triangular shape with a flat top on the waste canvas and just went from there. Most of the outer stitches are ¾ stitches to make the edges look straighter. Another thing I kind of threw in there was the back stitching between the colors of the lava, where the color matched the section right underneath it. So, for example, the back stitch between the orange and red sections was done in red. Everything was lined in black back stitch, including the divide between the lava and the rock. There was a lot of free form stitching and just trying to see what I could even do, which makes it hard to tell others how to do it. My main advice for the volcano is to just try!
Just to reiterate, I wanted to try something new during quarantine and I found this pattern that I thought would be cool on a sweatshirt, so I tried it out. Pretty much all of these patterns aren’t entirely my own, I just reformatted most of these patterns in order to make it easier for people who want to use them as cross-stitch patterns for a personal project like I did!
