Homebrew USB Frets on Fire (Guitar Hero -esque) Controller

FoF_14_Fretboard_Complete.jpg

All but the visually impaired will immediately notice that this isn't a robot. Nevertheless, it discusses some interesting electronic, interfacing and mechanical construction techniques.

The aim is to make a guitar-like controller for the excellent Frets on Fire game. I blame 668 for introducing me to this notion. Once you're addicted, I encourage you to blame him, too.

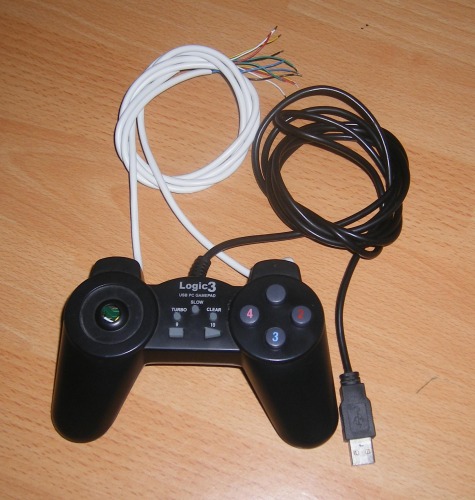
OKay, so I had enough of holding my keyboard upside-down and fingering the function keys while twanging the enter key, so I decided to build an "axe" out of an old joypad. Problem: I didn't have an old joypad. So I bought one off eBay for about $7 (including postage). Welcome to the internals of the Logic 3 USB Joypad.

FoF_02_Complete_Internals.jpg

Once it arrived, I tested it was electrically function, then took it apart and threw away all the bits I wouldn't need.

I decided to make this a testbed and as such have run wires from 8 of the buttons (even though FoF only requires 6).

FoF_03_PCB_Closeup.jpg

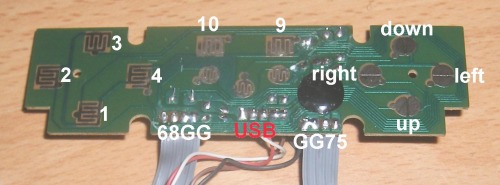
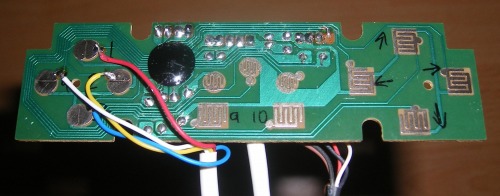
Above, see the topside of the PCB (it is upside-down) labelled with the functions of the various pads.

I added some extension wires to the board, to which the external switches would be connected.

FoF_04_Modded_PCB_01.jpg

FoF_05_Modded_PCB_02.jpg

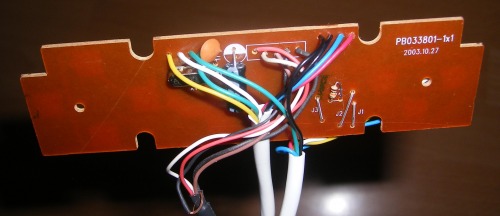
Here are where I soldered them onto the 1, 2, 3 and 4 button pads. You can also see the topside of the board, where I have desoldered the switches for the shoulder buttons and added extension wires in their place. Much neater than soldering onto the pads.

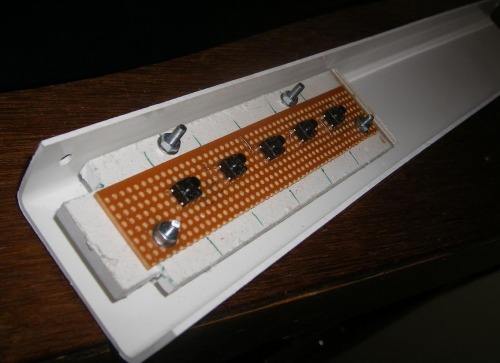
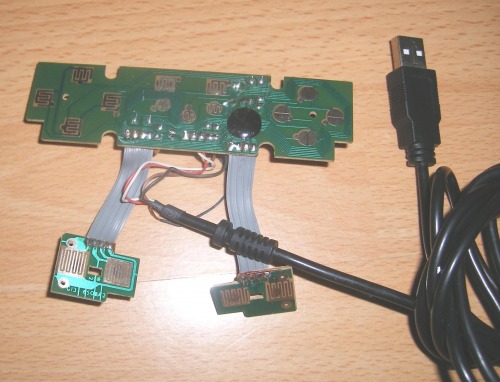
This is the finished interface. Each of the two white wires contains 6 cores. Two of the 6 are "common" (ground) and the other four each pertain to one of the switches.

It works well. A free program (what other sort is there?) called JoystickCursorTool is run before launching the gam. The purpose of this little gem is to take the input fromt he USB joystick and convert it into keystrokes. So any of my wires, when grounded effectively causes that character to be apparently sent from teh keyboard.

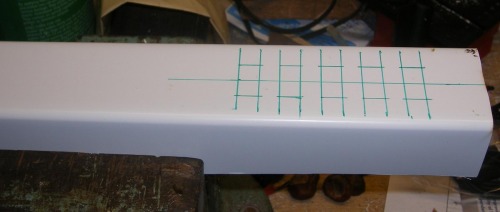
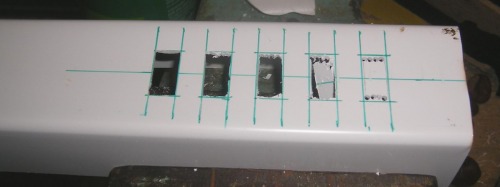
I think I know how to make the fretboard and I think I have an appropriate material.

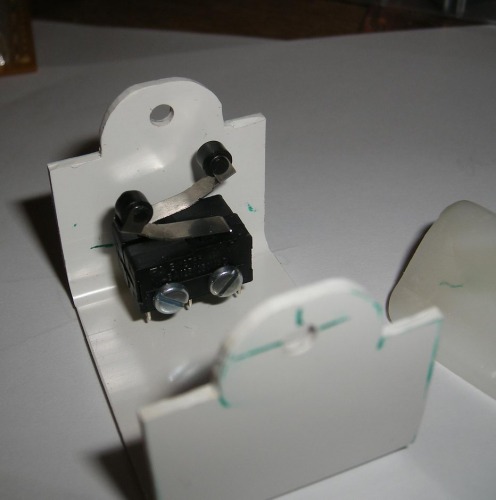
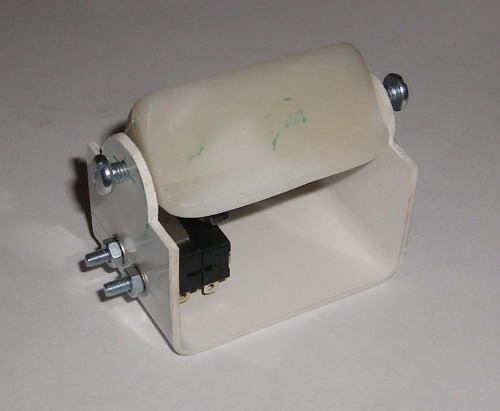
Now, I guess, comes the difficult part. I need ideas for the "strum" switch. I've only once, briefly seen an orignal Guitar Hero controller, and I THINK the strum switch worked in the up and down positions. No problem rigging a SPDT w/ centre off, but I'd like a nicer "feel" to it.

https://www.youtube.com/watch?v=wuOXEsSaE0I

nice one! :slight_smile: but you know

nice one! :slight_smile: but you know what, some songs are really hard to play on the keyboard because of their long and high-frequencied note streaks, so i want to make a controller not with buttons for strumming but with a temporary switch.

If you don’t know what i am talking about (but i actually know you are) it’s the switch that can have 3 positions but normally stays in the middle one. If you pull it left or right and the release it, it will go back in the middle.

This way you can move it quickly left and right and achieve high strumming frequency :). How i got the idea? I didn’t, the Guitar Hero guitar has it too. Since i didn’t have that switch (i actuually also don’t have it now) some time ago i came up with this:

|x

the thingey on the left is a 3-stage switch (it doesn't go back to the middle), i took it apart from a RC car remote, i attached it to the mouse just like you did with your joystick. But a get-back-in-the-middle switch would be cooler. But still i was able to pass "knights of cydonia" with this trick :)

Feel free to blame me, but remember to blame the user above for preventing you to sleep at night with his Electrostatic Discharge walkthrough. :D

Three position switch
Yep. I know what you mean. I called it a "SPDT w/ centre off" (Single Pole Double Throw). I should have added "with return to centre spring".

The Fretboard

OKay, this weekend, I started the mechnical bit. Guess what material I’m using? Yup: PVC ducting. This bit has been run down the saw so its 20mm tall. The enclosure involves overlapping two pieces together.

FoF_07_Fretboard_Template.jpg

Above, the "front" ready to cut.

FoF_08_Fretboard_Part_Cut.jpg

...and in various states of cut-ness.

FoF_09_Mini_Router.jpg

I wanted large-ish button caps so I decided to make my own to fit the square holes in the fretboard. I clamped my miniature drill to my Workmate and routed them. Quite pleased with the results.

This is the first pass. I put a flange up each side of a strip then cut the strip into smaller lengths and flanged each end.

FoF_11_Buttons_Second_Pass.jpg

Here are the buttons.

FoF_12_Switch_Board.jpg

Above are the momentary switches soldered onto a piece of stripboard.

FoF_13_Switches_Mounted.jpg

...and mounted into the fretboard.

I'll probably not get a change to look at this again until next weekend, when I'll make the "strummer." I have a plan moulding a bit of polymorph into a triangle cross section, and mounting a microswitch either side of it.


i wish i could do the things

i wish i could do the things you do…working with materials is my problem. Nice work really!

Some questions for you:

what’s the material you are using for the buttons?

what are you using for the cutting of the pvc?

Materials

I’m a software engineer. Mechanical engineering is always my major problem. I’m a scientist, so things have to be done correctly or not at all. (I’ll stop here, because otherwise this will turn into a blog post.)

You know, I have no idea what the material is I’m using for the buttons! There was a huge noticeboard in my office and the backing material looked interesting, so I took it home instead of putting it in the bin. It’s a plastic of some sort. It looks reasonably porus. It’s 5mm thick. It softens (without melting) in boiling water. It smells like peardrops (normally associated with acetyl keytones?) when you melt it or use a high-speed tool on it.

(Anyone who wants to hazard a guess at what it might be, or who can think of an experiment to help me ascertain what it is, feel free to jump in here.)

I use several tools to cut the PVC. One is a miniature circular saw (80mm dia blade) for straight cuts. To cut the holes, I drilled lots of 3mm holes round the outside, cut them out with a sharp craft knife and used a file to square them off.

Oh, and you MUST get a BIG bag of M3 and M4 nuts and bolts. Absolutely essential.

Update…

The stuff used in the big noticeboard may be expanded PVC. It looks similar to what’s used in mintvelt’s “Edward”.

Strummer

This week I got to work on the strummer. I made the user interface part of it from a lot of polymorph. I wanted it to be a triangular cross-section with flanges at the "back".

FoF_15_StrummerThumber.jpg

I've used two microswitches back-to-back as the "strum detectors". They're very clicky but it means I can strum in both directions.

Here's the assembled unit:

FoF_17_StrummerMk1Complete.jpg

I'm pleased with the result but I won't be using it. The assembly is nearly 40mm deep and the rest of the unit is only 30mm deep. I will keep the triangular part and try to smaller switches of a different way of mounting them.